How to Add Associate's Time as an Administrator
Your associates can always log/track their own time by utilizing the Time Clock that is part of the Mobile platform. However, the need may arise where the Profile Owner (Administrator) needs to manually adjust time logged on specific projects.
Adding Time Entry to Projects:
In order to add time for an Associate as an Administrator, follow the steps outlined below:
1. While logged into the FINSYNC profile as an Administrator, Click the New button in the top right.
2. Click on Time Entry found underneath Other. Doing so will redirect you to the Time Entry screen for Projects.
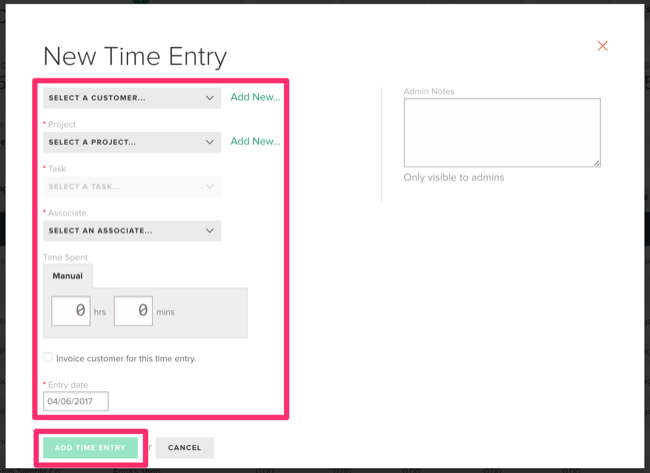
3. Fill out the New Time Entry form, including:
- Customer – Required field only if you want to send an invoice from the billable hours (see below)
- Project - Choose from an existing project or create a new one.
- Task - Choose from an existing task or create a new one.
- Associate – Only associates that are assigned to the task will be shown. If you don't see the correct associate, you need to open the task and add the associate to it.
- Time Spent – The actual hours worked. You can mark some or all of these hours as billable
- Date – When this time was worked.
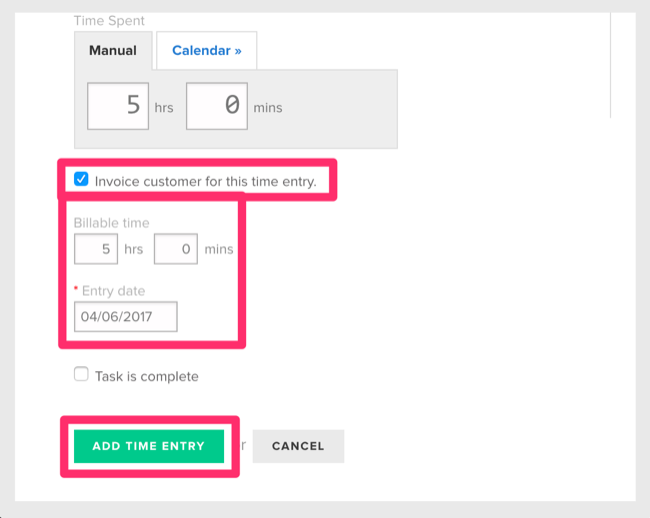
- Invoice - Choose whether or not you will invoice the customer for this time. If you mark the box to invoice a customer, the system defaults the billable time to the time spent, but you can adjust it manually if needed.
- Description – Optional, use the Description box to add notes you wish to make visible on the invoice to the customer.
- Admin Notes – Optional, use the Admin Notes box to add notes you only want to make visible to other admins.

4. When invoicing a customer for some or all of this time, mark the box Invoice Customer... You will then be able to input the number of billable hours associated with this time entry.

Adding Time to the Time Sheet:
In order to add time for an Associate as an Administrator, follow the steps outlined below:
1. Mouse over the Payroll tab located in the top menu and select Current Pay Run.
2. After locating the Associate/Employee you are needing to make adjustments for, mouse over the ellipses at the far end of the row and select View Time Sheet.
3. Enter into the time cell (squares) the corrected time amount for the respective day(s).
4. Use the green Save & Approve button and repeat the above process for any employees.