Follow the steps outlined below to Create and Pay Bills from FINSYNC:
1. Select Payments in the top menu.
2. Select Bills from the left-hand menu.
3. Select the green New Bill button on the right side.
NOTE: You are also able to click the '+' symbol on the right of Bills to create a new bill.
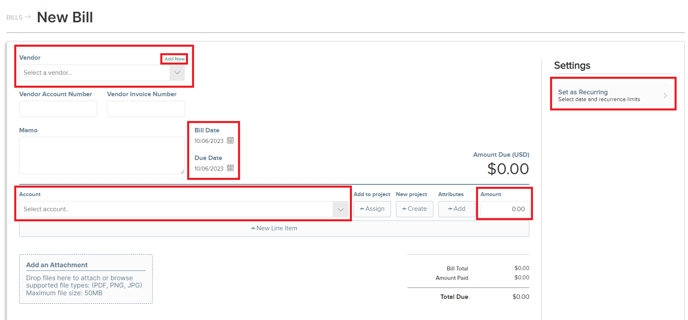
4. Fill out all Informational Fields:
- Select a Vendor from the drop down or use the Add New option to create a new vendor.
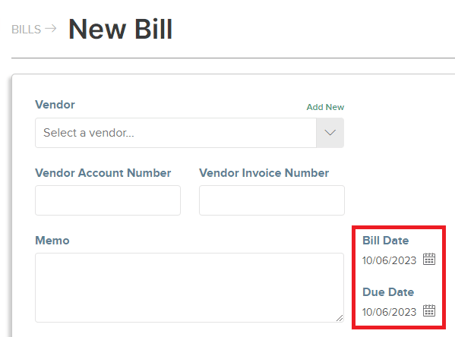
- (Optional) Enter a Vendor Account Number, Vendor Invoice Number or Memo.
- Enter in a Bill Date and Due Date by clicking on the date/calendar for each one.
- Select a GL Account from the drop down menu to set a category for this transaction.
- (Optional) Associate the Bill to an open Project or create a New Project to associate this bill.
- (Optional) Select an Attribute for the bill.
- Use the New Line to create a multi-lined/itemized bill.
- Enter in the Amount.
- (Optional) Designate the Bill to be Recurring. Using this option will expand additional options pertaining to recurring bills (such as start date and frequency). You will find this option on the right-hand side.
5. Select one of the following from the green Save button.
- Save: Saves the bill in your profile for tracking purposes.
- Save & New: Saves the created Bill and will open a new bill creation screen for an additional bill.
- Save & Pay Online: Saves the bill and sends the bill to the vendor for payment. You will have the option of choosing which account the funds will come from for paying the bill as well as choosing the payment method for the bill (ACH transfer, paper check, etc.).
- Save & Print Check: (If configured) Saves the bill and provides the option to print a check locally in the event you need to provide a physical check. See the article for Check Printing using FINSYNC for additional details and steps to configure.
- Save & Mark as Paid: Saves the Bill and will mark the bill as already paid outside of FINSYNC. You can also enter a check number if the bill was paid with a check and select the synced Cash/Charge account associated with the transaction (bill).
- Add for Approval: This will move the bill into the Unapproved queue and is most often used when one person is designated to create a bill and another person is designated to review and approve bills. Designated individuals can click on the Unapproved link on the left menu and review bills to be approved.
-1-2.png?width=249&height=238&name=Screenshot%20(22)-1-2.png)