It’s a good idea to periodically reconcile bank accounts to ensure the balance shown in FINSYNC reflects that of your actual bank balance. It is important to remember that FINSYNC is where all of your accounting happens, including the recording of money received and money spent whereas your bank account is where the cash transaction portion of that activity happens. There are a number of scenarios where there may be entries in FINSYNC that are not found in your bank account. One such scenario would be a check that has not yet been cashed by a vendor. Another would be where transactions may exist in your bank account that have not yet been recorded in FINSYNC, this is common for any transactions past 90 days from when you initially synced your FINSYNC account.
In order to Reconcile your bank account, follow the steps outlined below:
Note: You will want to have your latest bank statement available before proceeding.
1. Click on Banking from the top, mouse over Reconcile and select Start New from the drop down options.
-2.png?width=688&height=136&name=Screenshot%20(54)-2.png)
With your latest bank statement in hand, you can begin comparing everything in your FINSYNC bank account with everything in your actual bank account up to the end date on the bank statement. If this is your first time reconciling in FINSYNC, you'll want to be sure the beginning date of your bank statement is the date you began using FINSYNC.
Note: If you perform a reconciliation each month, for example, your bank statement should begin on the first day of the month being reconciled, and end on the last day.
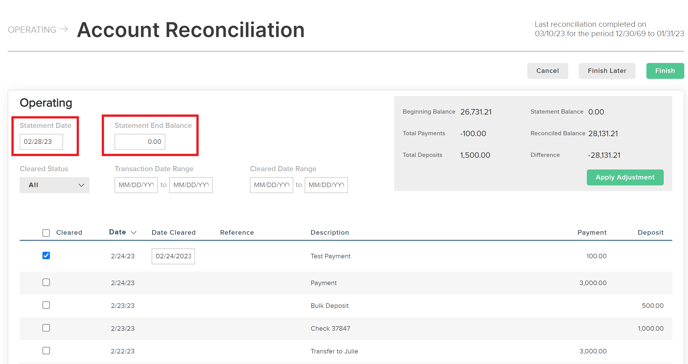
2. Enter the end date of your bank statement into the Statement Date field. This ensures that transactions in FINSYNC that are more recent than your bank statement won't appear in the list below.
3. Enter the ending balance from your bank statement into the Statement End Balance field. This is the balance of your bank account as of the statement end date.
Now you're ready to begin the reconciliation by reviewing all of the transactions on your bank statement to ensure they also exist in FINSYNC.
4. For each transaction that appears on your bank statement, check off the Cleared checkbox for the corresponding transaction in FINSYNC. The Date Cleared for that transaction will default to the bank statement date and this can be changed as needed.
What does "Cleared" mean?
A "cleared" transaction is one that has been posted to your bank account, whereas a "pending" transaction is one that has been recorded in FINSYNC (you wrote a check), but has not yet cleared the bank (check hasn't been cashed).
Many transactions may already be marked "Cleared" and have a cleared date when you begin the reconciliation because they were imported from your bank account or someone already marked them as cleared in the FINSYNC bank account register.
5. As you mark transactions as cleared, you'll see the Difference value in the upper right change. The goal is to get this number to zero, indicating there is no difference between the balance of your bank account and your balance in FINSYNC as of the bank statement date.

Tip: If you're reviewing a lot of transactions, use the Cleared Status, Transaction Date Range and Cleared Date Range filters to help you find what you're looking for. These filters don't affect the calculations or outcome of the reconciliation.
6. After marking all transactions from your bank statements as cleared in FINSYNC, there may still be a Difference value that is due to unrecorded bank fees or interest. Click the Apply Adjustment button to create an adjusting transaction to account for that difference.
Tip: To account for a Difference value that is more than just bank fees or other trivial amounts that can be adjusted, you may need to review your bank register or reports in FINSYNC, then come back to complete the reconciliation. To do this, click the Finish Later button to save your progress.
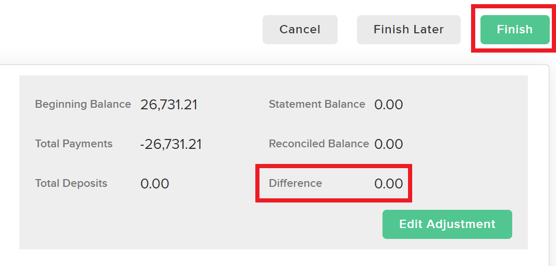
7. When your reconciliation is complete and your Difference value is zero, congratulations! You're ready to click the FINISH button. This will mark all cleared transactions as reconciled, preventing them from being edited.
8. Upon completing your reconciliation, you will be presented with a report of all the transactions included in the reconciliation. A report for each reconciliation will be saved in FINSYNC for future reference or to share with your accountant.
9. The Reconciled or Ending Balance from your last reconciliation will become the Beginning Balance for your next reconciliation. When you perform the next reconciliation, you will see a list of all unreconciled transactions in FINSYNC up to the bank statement date. This may include transactions that fall into the prior reconciliation period, but which had not cleared the bank at the time of your last reconciliation.
FOR EXAMPLE: you mailed some checks on May 30th and then reconciled the account for May a week later. Those checks did not clear the bank by May 31st, which is your bank statement date. Next month, on July 2nd, you reconcile the month of June. Those May 30th checks cleared your bank on June 6th and are part of the June reconciliation.
Related Articles:
Correcting Bank Feed Transaction Issues
How To Split Bank Transactions