Note: The ability to Print Checks is enabled/disabled from your Account Settings. Important settings and adjustments can be made within this settings page and are based on the specific check stock paper you will be using.
Example of Printed Check

Enabling and Changing Settings for Check Printing
1. Within the FINSYNC Business Platform, hover over the person icon in the right hand corner and select Profile Settings.
2. From the top menu, click Expenses.
- Scroll down to the Payments section and then the look for PRINTED CHECKS
- Click the checkbox My business prints checks from FINSYNC
- Set your elements and check margins
- Click Save Changes at the bottom

Important Information about the Check Printing Feature
- Formatted check stock is required, as the check printing process does not include elements such as a shaded background, security features, or the endorsement section on the back.
- Compatible check stock is limited to a three-part form with the top portion reserved for the check itself. You can use any compatible check stock. Here is a link to one option for compatible check stock for purchase through amazon: https://www.amazon.com/gp/product/B00L3NC8AI/ref=ppx_yo_dt_b_asin_title_o07_s00?ie=UTF8&th=1
-
Check printing within FINSYNC allows for one check to be printed per Bill. If there are multiple bills to be paid using a printed check for one vendor, then a check must be printed to pay each bill.
Note: Electronic payments via ACH supports paying multiple bills with a single payment.
-
Once a check is printed, it cannot be reprinted, so be sure it has printed correctly before completing the transaction. You will be prompted to confirm the check printed correctly before navigating away from the page.
Note: If for any reason, a printed check has errors (wrong vendor, wrong amount, etc.) we recommend contacting us HERE for next steps to ensure the error is properly corrected. - Certain details that auto-populate onto the check creation screen can be turned off from within the Settings of your Expenses section. For instance, the check stock you use may already come with pre-printed check numbers. You can remove the check number feature from within FINSYNC so the system is not printing a check number of its own when it is already printed on your check paper.
- When a check is printed, FINSYNC will automatically create a corresponding Bill for the expense that is tied to the Vendor you selected. Selecting the corresponding Bill will allow you to select a General Ledger Account associated with this Bill.
- FINSYNC will automatically create a corresponding Transaction that is matched with the bill for the Printed Check.
Note: Transactions that are auto-created based on a check being printed cannot be deleted.
How to Use the Check Printing Feature within FINSYNC
There are three options within the FINSYNC’s Payments feature to print a check. Click on the desired option below or scroll down to the section to view the steps to print a check:
- Using the Send Payment feature to print a check
- Printing a check from an existing unpaid Bill
- Printing a check while creating a new Bill
Option 1: Using the Send Payment Feature
1. Within the FINSYNC Business Platform, click Payments from the menu.
2. Click on Send Payment located in the left-hand menu under Payments Out.

3. On the Payments Out creation screen, select Print Payment.

4. Complete the following fields:
- Select a Vendor from the Vendor Name drop down or create a new Vendor profile by clicking Add New.
- Use the default Bank Account to pull the funds from or choose another account from the drop down.
- Enter the check Amount.
- Select a Category from your Chart of Accounts list (optional)
- Ensure the Check Date is correct, or make any changes as needed.
- Manually update the Check Number if needed.
- (Optional) Enter a Vendor Account Number or Vendor Invoice Number.
- (Optional) Enter information in the Memo field.
Note: Any information entered on the Memo Line will be placed in the Description line on the corresponding transaction.
5. There are two options for output (printing) of the check at the bottom of the window
Note: For both of the check printing options below, you will be prompted with a confirmation window that asks Did the Check print correctly? It is important to only answer Yes to this prompt after you have verified the output of the check. Selecting Yes will automatically create the corresponding Bill (Payable) and a Pending Transaction.

- Print: When this button is clicked you will see a preview of the check as it will appear when printing. This option is used to print the check directly to your printer.
- Download: When this button is clicked, the check will be produced in an Adobe PDF document. This allows you to have a digital copy of the check to be printed now or at any time.
It is important to only answer Yes to this prompt after you have verified the output of the check. Doing so will create the corresponding Bill and Pending Transaction. Failure to click on either of the confirmation prompts will result in the system not creating corresponding items (Bill & Transaction) as well allowing for the Check Number to be recycled on the next printed check.
Click this link to return to the list of check printing options within FINSYNC
Option 2: Printing from an Existing Unpaid Bill
1. Within the FINSYNC Business Platform, click Payments from the menu.
2. Click on Bills located in the left-hand menu under Payments Out.
3. Locate the Unpaid Bill from the list. Hover over the ellipses (3 dots) at the far right of the row and click Print Check.
.png?width=670&height=189&name=Screenshot%20(101).png)
.png?width=100&height=229&name=Screenshot%20(102).png)
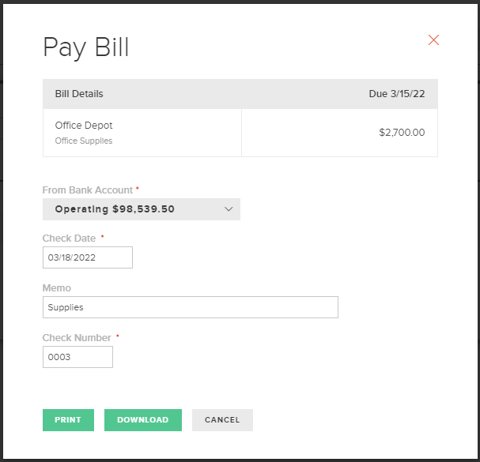
4. On the Pay Bill screen, complete the following fields:
- Select the Bank Account from which funds will be withdrawn.
- Ensure the Check Date is accurate.
- (Optional) Enter information in the Memo line.
- (Optional) Enter the Check Number.

5. There are two options for output (printing) of the check at the bottom of the window
Note: For both of the check printing options below, you will be prompted with a confirmation window that asks Did the Check print correctly? It is important to only answer Yes to this prompt after you have verified the output of the check. Once you select Yes, the same check cannot be viewed again or reprinted.
- Print: When this button is clicked you will see a preview of the check as it will appear when printing. This option is used to print the check directly to your printer.
- Download: When this button is clicked, the check will be produced in an Adobe PDF document. This allows you to have a digital copy of the check to be printed now or at any time.
It is important to only answer Yes to this prompt after you have verified the output of the check. Once you select Yes, the same check cannot be viewed again or reprinted.
Click this link to return to the list of check printing options within FINSYNC
Option 3: Printing a Check While Creating a New Bill
1. Within the FINSYNC Business Platform, click Payments from the menu.
2. Click on Bills located in the left-hand menu under Payment Out.
3. Click New Bill on the right.
4. Complete the necessary fields on the New Bill screen.
5. Hover over Save on the bottom right and select Save & Print Check.
.png?width=200&height=150&name=Screenshot%20(103).png)
6. On the Pay Bill screen, complete the following fields:
- Select the Account from which funds will be withdrawn.
- Ensure the Check Date is accurate.
- (Optional) Enter information in the Memo line.
- (Optional) Enter the Check Number.
5. There are two options for output (printing) of the check at the bottom of the window
Note: For both of the check printing options below, you will be prompted with a confirmation window that asks Did the Check print correctly? It is important to only answer Yes to this prompt after you have verified the output of the check. Once you select Yes, the same check cannot be viewed again or reprinted.
- Print: When this button is clicked you will see a preview of the check as it will appear when printing. This option is used to print the check directly to your printer.
- Download: When this button is clicked, the check will be produced in an Adobe PDF document. This allows you to have a digital copy of the check to be printed now or at any time.
It is important to only answer Yes to this prompt after you have verified the output of the check. Once you select Yes, the same check cannot be viewed again or reprinted.

Click this link to return to the list of check printing options within FINSYNC
Related Articles:
How to Enable Lockbox for Receiving Payments by Check
What Your Vendor Receives When You Remote Issue a Check
Overview of FINSYNC's Lockbox Service